Smart Home Garden Lounge

For a while now, we have wanted to make better use of the space in our garden and have another place to relax, rather than sitting at the 'dining' table on our round patio. We decided to go for a outdoor 'indoor living space' in the form of a garden lounge with sofas and to make many elements of it smart. This photo is our inspiration (without the sea view!).

This is what our garden lounge currently looks like as of May 2022.
Objective
As with all my smart home projects, the objective is simply to improve our quality of life and to deliver a great user experience. This means keeping things simple, stylish and ideally delivering a zero touch user experience wherever possible. With this project, I aim to add a luxury feel to our garden.
Design
The plan is create a lounge area using composite decking. Because we have neighbours, I don't want the decking to be raised, so it will be at ground level. The decking will fill a rather odd shaped corner of our garden and so it has been shaped to fit this space, whilst mirroring some of the other design features and shapoes in our garden.

Having worked out the area to be covered by decking, I put the design into Autodesk Fusion 360, to work out what materials are required to build it. Whilst ordering the decking, it made sense to also replace the ancient wooden fence panels with matching composite fencing.
Screens
One of the back walls is a wooden fence owned by our neighbours. I've left a 10cm gap along this edge of the decking to add a screen later. This back edge of the decking also has the LED strips for uplighting.
Furniture

The original plan was to have two 3-seater sofas but, we eventually decided on this Long Island corner unit for a modern look.
Parasol
The plan is to install a 3.5m or 4m cantilever parasol.
Lighting
The garden room will have the following lighting, all connected to my contextual smart home:
Garden Lounge Wall Lights
RGB+WW 24V LED strips along the rear edges of the composite decking in deep aluminium profile. One length is 3.2m and the other 3.5m and these are connected in parallel. These will uplight the rear walls in my chosen colour. I've also left a 10cm gap along the neighbours side of the decking in case we want to add decorative screens later (in front of their fence panels).


To further prolong the life of the LED strip, it is recommended that it is covered in a clear epoxy resin. I plan to do this.
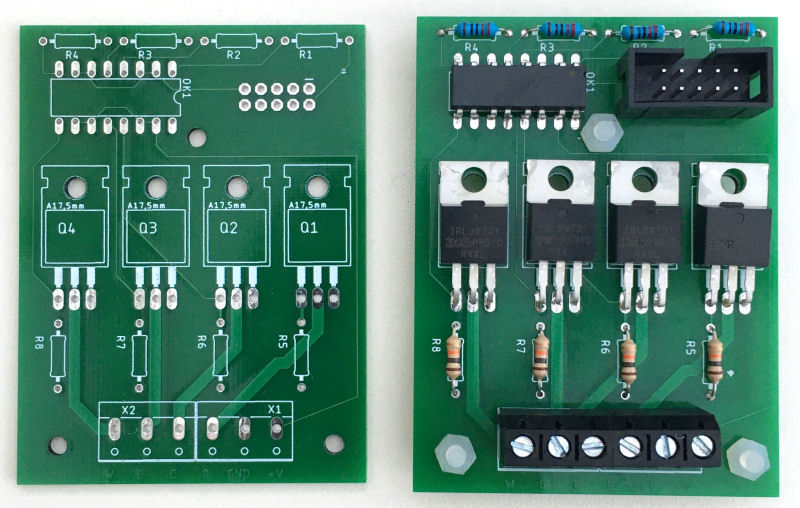
For the control, I developed my own RGBW controller and had some PCBs manufactured. These enable high- power control at 12V or 24V dc via an Arduino. It supports 4 channels using Pulse Width Modulation (PWM).
My Arduino software allows very powerful control of these LED strips and it supports effects and visual visual notifications.
Parasol Lights
Festoon lights or integrated into the parasol.
Bamboo Lights
Decorative lights within a potted 'wall' of bamboo between the decking and the adjoining patio area.
Höfats Spin

It's a bit risky to use open fires and fire pits on composite decking, so I'll be using our two Höfats Spin lamps in our garden lounge. These use bioethanol and put out quite a lot of heat. Mostly, they just look really cool :-)
Power
As part of a wider garden revamp, I've run armour-plated mains power cables within 25mm ducting about 45cm below ground level. This runs to a wall-mounted enclosure.
Networking
I have also run four Gigabit Ethernet cables in 25mm ducting about 15cm below ground. Two run to the wall-mounted enclosure and two run through it and onwards to the smart pond enclosure. The plan is to use one for each Arduino, one for a pond camera and the other is spare, in case I want better Wi-Fi coverage in the future. For now, my mesh Wi-Fi easily covers my whole garden and provides very good speeds.
Enclosure

The enclosure I'm using is an IP rated ABS box, 32cm × 24cm × 13cm. It's quite big but 25mm plastic ducting for network and power run into it. It is wall mounted (about 30cm above soil level) and also hidden behind a cover, because it's not very pretty to look at.
I've built wooden covers over my enclosures for now but, I have quite a lot of spare bits and offcuts of composite decking and fencing, which I will use to build matching covers.
Sensors
I plan to have a number of sensors connected to my contextual smart home:

I'm using a GJD GJD020 'Opal XL' PIR sensor to detect occupancy. This is the 'Garden Lounge PIR'.
The sensor is provided with 12V power via the 4-way Molex connector on my Smartisant Arduino PRO1 PCB board and the PIR module pulls an Arduino input LOW via its open collector output.

In order for this slave processor to take autonomous action, it also needs a local light level sensor. This will also be reported back to my Home Control System. This basically means the 'Garden Lounge Lights' can be operated automatically based on the local PIR, as well as being intelligently controlled via my contextual smart home and all of its associated user interfaces.
Even within my garden, I'm using a nested zone model. The 'Garden Lounge', 'Patio', 'Shed Path', 'Shed' and 'Side Path' are all zones that sit within the 'Garden' zone.
Smart Home Control

My plan is to use my Smartisant Arduino PRO1 PCB board (V3) to enable all of the smart sensors and control functionality. It will be housed in the wall mounted, waterproof enclosure and mounted to the brick wall. This gives me 32 digital inputs/outputs and the ability to use my Smartisant 8-channel high power output board OP3 for pump and lighting control. It also supports Dallas 1-Wire temperature sensor and 8 analogue inputs.
I've been using Arduino devices like this in my smart home for 10+ years, many in very harsh environments. They have been 100% reliable and provide excellent performance at very low cost.
Garden Lounge Sockets

Underneath the enclosure will be weather-proof double sockets. These are in case I need to power anything in our garden room. Both of these sockets will be under intelligent control by my contextual smart home.
They have manual switches and are paired, so they can't be controlled individually but, they can be manually disabled individually if required. They are modelled as an Appliance called 'Garden Lounge Sockets' by my contextual smart home.
Hot Tub
Whilst I'm doing the ground work and ducting for this garden lounge, I'm also putting in ducting for a future hot tub. This is to allow for higher power cables (32A).
The Build

Things got properly serious with the delivery of £1700 / 850Kg of composite decking and fencing. This includes all the joists, fixings, edging strips, etc. I've never laid composite decking before but the supplier provides a comprehensive instruction booklet. How hard can it be? :-)

This is the area cleared, ready to set the levels and put in the foundations. The enclosure, ducting and cables have all been installed.

The composite decking arrived on a huge 4m pallet. I've taken this apart to use the longer lengths as shuttering/edging for the concrete base. The top of this will also be used to set the right level and incline. The top of the decking is to be at ground level, so I have to set the level to account for the thickness of the decking (25mm thick) and the support joists (30mm deep).
In order to dig down for the concrete foundations, I've had to get several skips to put all the spare soil in and I've advertised free top soil all over the place, to try and get rid of as much of it as I can.

It took a while but the foundations have been dug out. I have removed over 3 tons of soil in total. Now I get to fill it all back in again with hardcore and concrete.
You can also see the new composite fencing is installed in this photo.

It took three days to complete the concrete foundations.

Installed the composite support joists. The composite decking is fixed to this support framework using hidden T-clips.

The decking is held in place by these T-clips. They come in packs of 100 (with screws) and I bought 2 packs but, it wasn't quite enough. These are very clever and easy to use. They provide almost invisible fixing of the decking planks.

The T-clips come with these stainless-steel screws. You need an good PH2 bit, long enough to not foul the decking planks.
Stainless-steel screws are not as strong as steel screws, so you have to be careful to not over-tighten them. I used an electric screwdriver to fix them in place with a fairly low clutch setting and then did the final tighten by hand.

After two days of hard work, the decking is nearly complete. The weather has stopped progress for now and I've also run out of T-clips. Some more have been ordered.

The decking is complete! Rain delayed things slightly and so did running out of T-Clips but, I was only 2 days over my self-imposed deadline.
The two untidy wooden fence panels are not ours to change but, we plan to put a screen in front of them and I've left a 10cm gap along this edge of the decking for this.
Installation & Testing
Power
I've run 3-core armoured cable in 25mm ducting from the shed to the garden lounge enclosure. I've also run another cable from this enclosure onwards to the patio enclosure. At the shed end, I've installed a fuse faceplate (with 5A fuse) and an isolation switch.

In the garden lounge enclosure is the 24V dc lighting transformer. The 24V goes to the Arduino board with it's own 5V dc-dc converter, which can handle up to 28V dc as its input. A second dc-dc convertor provides a 12V dc supply for some 12V sensors.
Networking

I've run 4 Ethernet cables in ducting to my shed. I identified and labelled them, using a battery connected to two wires and a multimeter at the other end to detect the applied voltage. These are then connected into a wall-mounted 8-way patch panel.

All four cables run into the garden lounge enclosure but, two of them run onwards to the patio enclosure. In each enclosure, I'm terminating the Ethernet cables using a twin RJ45 faceplate.
It's well worth investing in a good punch-down tool. I then used a network cable test tool, to check the connections are good.
Garden Lounge Lights

My original plan was to fix the aluminium LED strip lights to the decking frame but, I decided to fix them in one piece and on brackets, so they can be easily removed later, if necessary. This means the aluminium needs to be one rigid piece and I need to extend one 3m length by about 20cm and another by about 40cm. I've decided to use a short length of 90° profile and have used Ardaldite glue to fix this in place as a support brace and to keep the pieces aligned.
This means I can add the semi-clear diffusers and fill the channel with a clear expoxy resin, by tilting them at an angle before they are fitted.

To prolong the life of the LEDs in an outdoor environment, I'm encapsulating them in a UV resistant, clear expoxy resin. This was quite a challenge as it meant the profiles couldn't have any gaps for the resin to leak out. I did an initial fill to about 3mm deep. The resin won't reduce the light output but, this is not a problem anyway, as the strips are very bright on full power.
I've now fully encapsulated the LED strips and filled the profile. I'm really pleased with the way the joins have become invisible.
Summary & Updates
This has been my biggest smart home project to date (Home Control System aside) and certainly the most physical. I lost quite a bit of weight whilst working in the garden solidly for nearly two months, on this and my smart pond and smart patio.
I'm really pleased with the composite decking from Cladco has turned out. They provide good instructions and all the things a DIY'er like myself needs to make a decent job of it. The cost of the materials to do the fence panels alone were 20% of the cheapest quote I got, so doing work like this yourself is a LOT cheaper.
May 2022
This is what our garden lounge currently looks like as of May 2022. The one thing left to do, is to screen the neighbours tatty fence and make the space look more coherent as a room.
July 2022

We have been using the garden lounge a lot this summer. I often sit outside and have my breakfast here. This is view looking along the back fence and over the pond. We have slightly re-organised the corner sofa, to provide more space.

I've now ordered some more composite fencing from Cladco to screen these two fence panels. I'll be creating another fence just in front of them, which will match the other fencing shown here.
August 2022

This is with the screen installed.


